As a leading authority in appliance maintenance, we understand the frustration of a dwindling battery life in your Dyson cordless vacuum. Whether your device struggles to hold a charge or performance has dropped, replacing the battery is a cost-effective solution to restore its original power. Today AussieBatt experts share this guide, crafted with expertise from Dyson’s official resources and real-world user experiences, provides a detailedtutorial to help you replace your battery safely and efficiently.
Why Replace Your Dyson Battery?
Dyson’s lithium-ion batteries typically last 2–3 years with regular use. Signs of degradation include:
- Reduced runtime (e.g., 10 minutes vs. the original 40+ minutes).
- Sudden power cuts during cleaning.
- Failure to charge despite being plugged in.
 By replacing the battery, you’ll extend your vacuum’s lifespan and save hundreds compared to buying a new handheld Dyson vacuum cleaner.
Tools & Materials You’ll Need
- Genuine Dyson battery (compatible with your model, e.g., V8, V10, V15).
- Crosshead screwdriver (PH1 or PH2 size).
- Clean cloth (for wiping dust from the battery compartment).
- Safety gloves (optional but recommended to avoid static discharge).
Pro Tips: Always purchase batteries from Dyson’s official site or authorized vacuum battery retailers like gbatteryshop.com to ensure compatibility and safety.
Step-by-Step Replacement Guide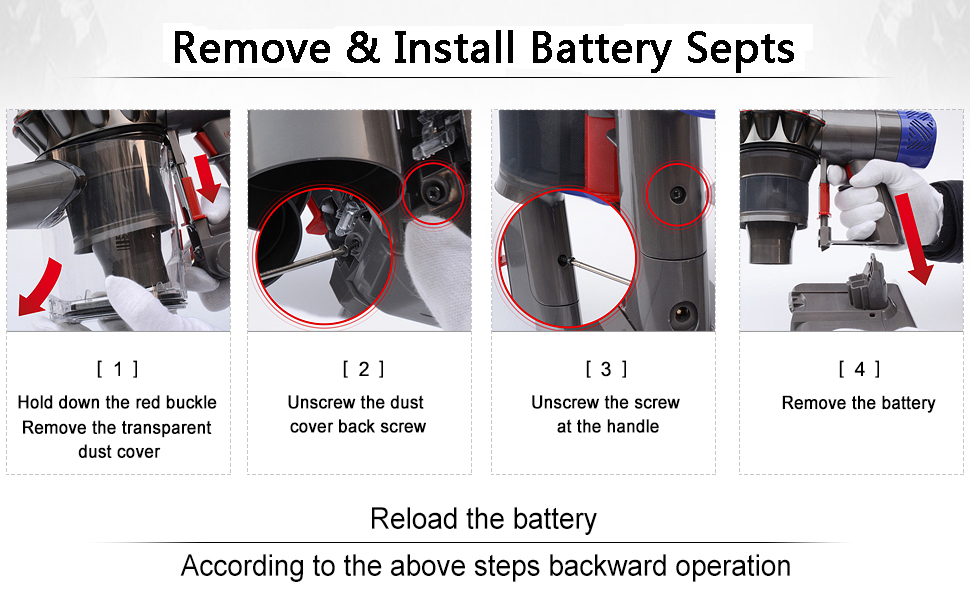
Step 1: Power Down & Prepare
- Turn off your vacuum and unplug it from the charger.
- Lay it on a flat surface with the battery compartment facing up.
Step 2: Locate & Remove the Old Battery
- For V8/V10 Models:
- Remove the handle screw (located near the top).
- Gently pry open the battery cover using a flathead screwdriver.
- Disconnect the battery’s wiring harness by pressing the release tab.
- Slide the old battery out.
- For V11/V15 Models:
- Remove the torx screws securing the battery module.
- Lift the module out carefully, avoiding damage to internal components.
Step 3: Install the New Battery
- Align the new battery’s connectors with the ports in the compartment.
- Press firmly until you hear a “click” (for snap-in models) or reattach the wiring harness.
- Secure the battery cover/module with screws.
Step 4: Test & Calibrate
- Charge the vacuum for 3–5 hours using the original charger.
- Run a test cycle to check runtime and suction power.
Post-Replacement Best Practices
- Avoid Extreme Temperatures: Store your vacuum at 18°C–28°C (64°F–82°F).
- Use Eco/Auto Modes: Reserve Max/Boost modes for spot cleaning to prolong battery health.
- Monthly Discharge: Run the battery to 20% once a month to prevent memory effect.
A new battery revitalizes your cordless Dyson vacuum, ensuring it tackles pet hair, carpets, and hard floors with ease. Share your replacement story in the comments or tag us on LinkedIn—we would love to feature your success!

Leave a Reply